10/30/20

vROps 8.2 – Get Metrics/Properties sorted

Sometimes it is easier to identify which kind of metrics/properties are provided with a vROps Version or/and Management Packs if you have a list where you can just use filter to find something instead of “clicking” through all Objecttypes. 😉

Here we go! I’ve created an Excel export based on vROps 8.2 with following additional Adapter enabled/configured/installed which are included in this Excel File:

  • vSphere Adapter
  • vIDM Adapter 1.1
  • Horion Adapter 6.7
  • NSX-V 3.6
  • SDDC Management Pack 8.1
  • In vROps Version integrated and Activated:
    • NSX-T 8.2, LogInsight, vSAN, vRA, Ping Adapter, OS / Remote Monitoring

Have fun! 😉

10/29/20

vROps 8.2 – Ping Adapter available

With vROps 8.2 VMware provides a new Adapter for Pinging systems. In the past customers have to use Agents like EPOPS/Telegraf to have the capability of ping systems.

Now it comes natively with vROps and it just needs to be activated within your Repository:

After you have enabled the Adapter you can configure it through “Other Accounts”

The configuration parameter are as follows. You define the Adapter Instance Name, Address List, the ping intervals, packet size etc.

If you have different Remote Collectors (different location) you can create own Ping Adapter Instanz for address which needs to be pinged by a special collector/collector group.

You can also use a config file to define the list of addresses which needs to be checked within a single Adapter Instance:

These are the Objecttypes/Structure which are provided by the Ping Adapter after you enabled it:

And these are the metrics/Properties for the FQDN Objecttype

I didn’t tested so much with the new Ping Adapter but feel free to contact me for any feedback.

10/28/20

vROps 8.2 – Content Backup

VMware released vRealize Operations Manager 8.2 and brings one of the most requested feature by the customer – Backup the Content with a single Button .

Based on the data size and limitations of vROps most of the customer decided to not backup vROps with the standard procedure (whole VM (includes historical data)). Most customer were just interested in all the custom created content like Dashboard, Views, Reports, Metric Configuration, Supermetrics etc. where they put so much effort in it.

There were lot’s of streams started to create custom Scripts to get the necessary Content through API/OPSCLI.

Now in 8.2 we can Backup the whole Content with a single Button and download a single compressed file.

Even if you want to automate it you can trigger it via API aswell (btw. vROps 8.2 is using the Swagger now too). 😉

Just keep in mind if you don’t use a “Service Account” for creating all the Dashboards just the dashboards which are assigned to your current user will be exported because dashboards and users have a 1:1 assignment.

04/18/18

REST Call (GET) with Powershell

This post is about “How can I use Powershell to get data from my vROps Instance over the API”?

It sounds really easy and the line of code for an invoke is really short but there are some painful points.
So we will start with a GET Method with Powershell for vROps.
This is the REST Call:

invoke-webrequest -credential $cred -Uri Invoke-RestMethod -Credential $RESTcredential -Uri https://vrops.pso.local/suite-api/api/adapters -ContentType "application/json" -Method Get

The $cred variable is based on the following code. It is important for me to haven’t the password in plain text.

$user = "admin"
$secpasswd = Get-Content C:\Users\kbruesch\Desktop\Scripts\RESTCallCreds.txt | ConvertTo-SecureString
$RESTcredential = New-Object System.Management.Automation.PSCredential($user, $secpasswd)

My biggest problem with this CALL was that I got always the same error message:
the underlying connection was closed: an unexpected error occurred on a send.

The solution for me wasn’t to easy allow self-signed certificates with: [System.Net.ServicePointManager]::ServerCertificateValidationCallback = {$true}

I used this implementation in my script:
add-type @"
using System.Net;
using System.Security.Cryptography.X509Certificates;
public class TrustAllCertsPolicy : ICertificatePolicy {
public bool CheckValidationResult(
ServicePoint srvPoint, X509Certificate certificate,
WebRequest request, int certificateProblem) {
return true;
}
}
"@
[System.Net.ServicePointManager]::CertificatePolicy = New-Object TrustAllCertsPolicy

After your Invoke-Request is running you get an Status Code of 200 which means it was succeeded:
Bildschirmfoto 2018-04-18 um 22.40.52

Now you can use the content part to get all the data you want like Adapter Instance Name to Adapter Instance ID

04/16/18

Using the vROps API

Everytime I’m onsite at a customer the statement comes up … “What about the integration of…”. Sometimes you can say  “Yes, that is integrated per default”. But you have also these UseCases where you have no OOTB Solution. You can solve some of these with the REST API or Powershell Commands for vROps.
In the past I used a lot the REST API to get data or to push data to vROps. I was using Postman for all these tasks. But it was only to test some things and to start with the REST Call procedure.
Some stuff are easier to get or post over the API then to do it manually. But there are lots of things that are not possible over the API like Export of a vROps View or Dashboard creation … So it is not the mechanism to solve all problems but a lot. 😉

You will start with some easy things like to get all resources from vROps. Oh Yes, good point there is ofc an easier way called Powershell (try this):

Connect to the vROps Server Instance
#connect-omserver vROPsFQDN

List all resources from vRops
#get-omresource

Bildschirmfoto 2018-04-16 um 20.19.51

Or you can use the REST API instead:

Bildschirmfoto 2018-04-16 um 20.38.40

Bildschirmfoto 2018-04-16 um 20.38.18

Bildschirmfoto 2018-04-16 um 20.21.43

Here you can find the documentation for the vROps CLI CMDLETS (Link)

And here you get the API Documentation:

  • https://FQDNofyourvROps/suite-api/docs/rest/index.html

(keep in mind there are two different types of APIs – Public and Internal. Only the public one is supported by VMware

But I think one of the most requested things in the past are POST calls to extend vROps with content that are customer / UseCase related … So one of my next Post will be about how to automate a REST Call (POST) in vROps with the Powershell! For example your own script result in vROps?

04/16/18

VMware vRealize Automation in vRealize Operation Manager 6.7

After VMware announced the new vRealize Operations Manager Version 6.7 I think it is time to spend more time in writing some posts about my experiences over the last years.
There are some interesting features that are coming with 6.7 and I think there are lots of blogs (Like here) with the basic integration. So I don’t want to bother you with the exactly same stuff.

So let starts with the vRA Integration in vROps.

vRealize Automation – Adapter Version 4.0 (included in vROps)
In the release 6.6.1 with the vRA Solution Adapter maybe you already realized that there were some metrics missing which are really relevant to analyse or calculate vRA content like Business Groups or Reservations.
Most of my customer were using this Management Pack to see the relationships between objects like Reservation to Cluster … Business Groups to VM etc. Cause there were not so much more information about the vRA content. In the past you can remember you had usage metrics and total capacity.
Now in vRA 4.0 you can see again such stuff like Free, Allocation, Reserved, Used, Deployment Count, Failed Requests count and Total Reservation Count for Business Groups. Or similiar things for the whole tenant or the reservations. Furthermore you don’t need to create a Supermetric to count the VMs now you have a metric that shows you the VM Count for Business Group. 😉

Have fun …

02/27/15

VMware vRealize Operations Manager 6 – Custom Views

In VMware vRealize Operations Manager 6 ist die Möglichkeit Custom Views und Reports zu erstellen für die Kunden ein guter Gewinn. Sie sind in der Lage unternehmensspezifische Abfragen und Darstellungen zu generieren und diese später in Ihren Reports aufgeschlüsselt/Sortiert/Übersichtlich und als PDF/CSV per Mail zu verschicken.

Wir starten mit den Custom Views. VMware bringt mit dem vCOPs 6 sehr viele vorkonfigurierte Views mit. Um ein individuellen View zu erstellen, gehen wir zunächst auf die Content PageBildschirmfoto 2015-02-27 um 09.21.42

Hier gibt es die Möglichkeit den Operations Manager individuell durch custom Reports, custom Views, Dashboard Konfigurationen und weitere Einstellungen anzupassen. Ein Klick auf Views und wir können die vorkonfigurierten Views sehen. Um einen eigenen View zu erstellen klicken wir auf das “grüne Plus” und hangeln uns durch den Wizard.

Namen und Beschreibung des Views definieren, am Besten etwas Aussagekräftiges. Wie zum Beispiel “VM Snapshot Summary”.
Bildschirmfoto 2015-02-27 um 09.27.47

Dann wählen wir die Art wie die Daten dargestellt werden sollen. Wir wählen die Darstellungsart “List” aus, da diese für unsere Art von Daten am übersichtlichsten ist.
Bildschirmfoto 2015-02-27 um 10.30.29

Bei Subjects, wählen wir im Drop-Down Menü die Ressource aus, von wo wir die Daten haben wollen. Also VM, Datastore, Cluster, Folder, etc. Wir nehmen Virtual Machine, da wir Informationen von VMs in unseren Views integriert haben wollen.

Nächster Step ist die Auswahl der Daten die wir haben wollen, da können alle Metriken ausgewählt werden, die für unser Objekt (VM) zur Verfügung stehen. Ich nehme dabei den Snapshot Space. Bildschirmfoto 2015-02-27 um 10.32.01

Da wir uns nach der Auswahl die Darstellung unserer Daten so nicht vorstellen können, kann man über den Link “Select preview Source” eine Datensource angeben, um unser Summary mit Daten anzuzeigen. Ich wähle den vCenter Server aus.
Bildschirmfoto 2015-02-27 um 10.35.48

Bildschirmfoto 2015-02-27 um 10.36.12

Jetzt können wir auch noch ein Summary hinzufügen, um die Gesamtgröße aller Snapshots anzeigen zu lassen. Dazu auf “Summary” klicken und auf wieder auf das “grüne Plus” für Add. Bildschirmfoto 2015-02-27 um 10.37.23

Und zum Schluss sieht unser View folgendermaßen aus.

Bildschirmfoto 2015-02-27 um 10.39.42

02/26/15

Installation vCenter Appliance 6.0

Bei der Installation der vCenter Appliance 6.0 hat sich das ein oder andere verändert. So können nun auch bei der Appliance Service auf unterschiedlich Systeme bereitgestellt werden. Aber nicht ganz so granular wie beim vCenter auf der Windows Plattform. Man unterscheidet bei der Installation zwischen dem vCenter Server System und dem Infrastruktur Controller. Sie unterscheiden sich in der Bereitstellung der Dienste, d.h. wer stellt welche Dienste Bereit.

vCenter Server
– vCenter Dienst
– vSphere WebClient
– Inventory Service
– Auto Deploy
– vSphere ESXi Dump Collector
– vSphere ESXi Syslog Collector

Infrastruktur Controller
– SSO Service
– Lizenz Service
– Lookup Service
– VMware Certificate Authority

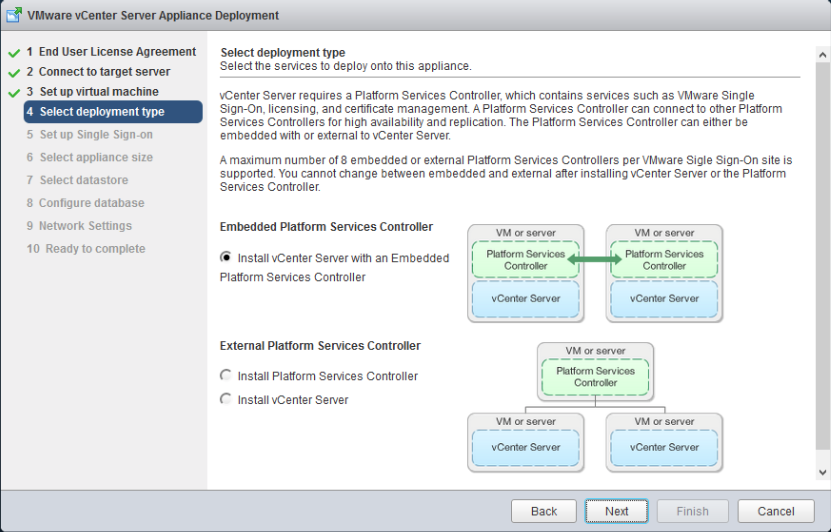
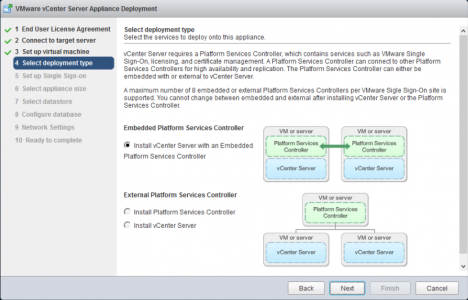
Man ist natürlich auch in der Lage alle Dienste wieder auf dem selben System bereitzustellen. Allerdings kann es für manche Kunden nützlich sein, Dienste auf zwei Systeme zu verteilen um besser mit den virtuellen Ressourcen zu managen. Des Weiteren kann der Infrastruktur Controller auch für mehrere vCenter Server System dienen um eine zentrale Authentifizierung mit SSO zu gewährleisten.

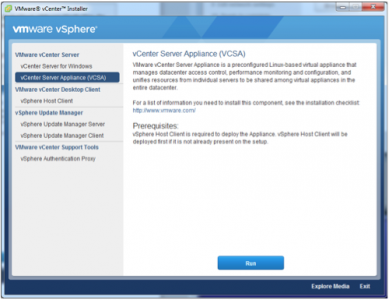
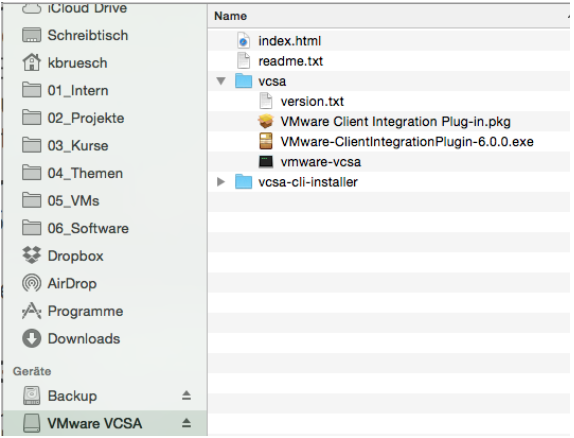
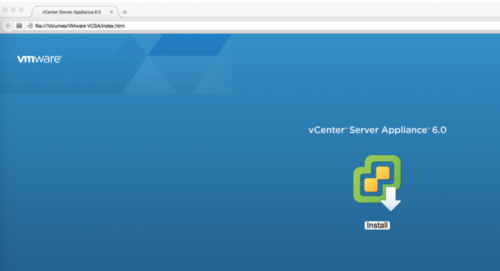
Nun zur Installation, man kann die Appliance entweder explizit runterladen, allerdings handelt es sich dabei um keine OVF/OVA Datei, sondern um ein ISO. Dieses ISO beinhaltet Dateien für die Installation der Appliance, Startpunkt ist die Index.html.

Bildschirmfoto 2015-02-26 um 09.58.43

Die Index.html ist unser Startpunkt.

Bildschirmfoto 2015-02-26 um 09.59.20

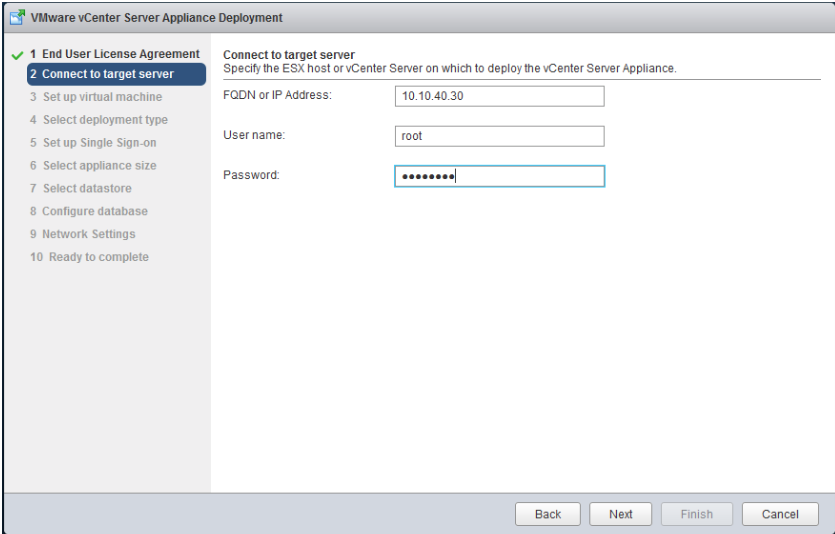
Dann die EULA akzeptieren und das Target System definieren auf dem die Appliance ausgerollt werden soll. Dies kann ein einzelner ESXi Host sein, oder aber ein anderes vCenter (MGM Cluster).
Bildschirmfoto 2015-02-26 um 09.59.30

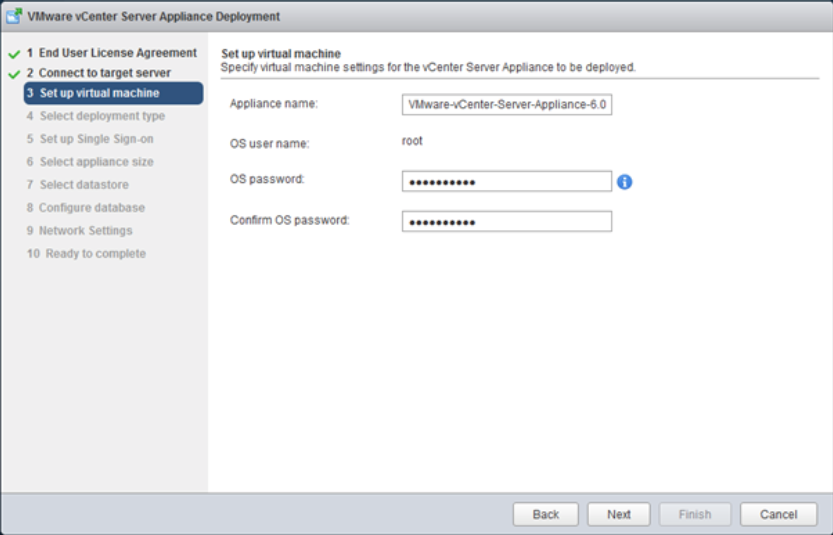
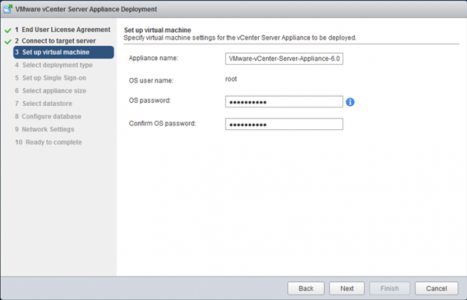
Login und Hostdaten für die Appliance definieren.
Bildschirmfoto 2015-02-26 um 09.59.39

Dann wird die Art des Deployments ausgewählt. (Siehe obere Beschreibung, vCenter Server, Infrastruktur Controller)
Bildschirmfoto 2015-02-26 um 09.59.45

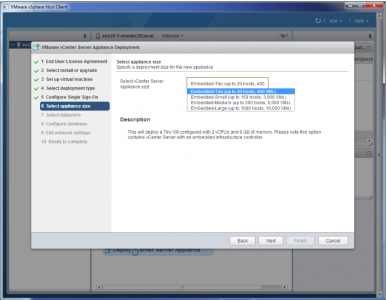
Hier werden SSO Account Daten hinterlegt und die Appliance Größe wird definiert, wahrscheinlich aufgrund der Ressourcen Größe (vCPUs, vRAM) und der Java Cache Size.
Bildschirmfoto 2015-02-26 um 09.59.57

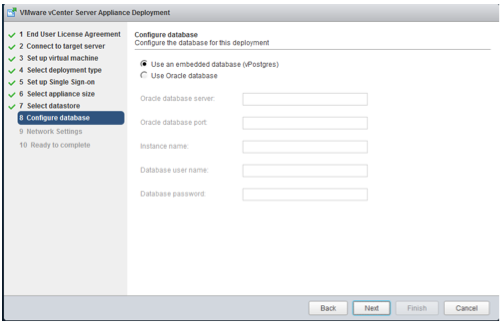
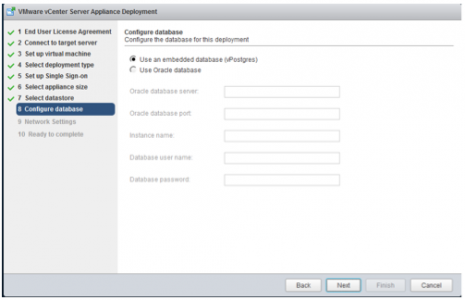
Jetzt wird der Target Datastore ausgewählt und die Datenbank konfiguriert, entweder die Embedded vPostgres oder eine externe Oracle DB.
Bildschirmfoto 2015-02-26 um 13.07.42

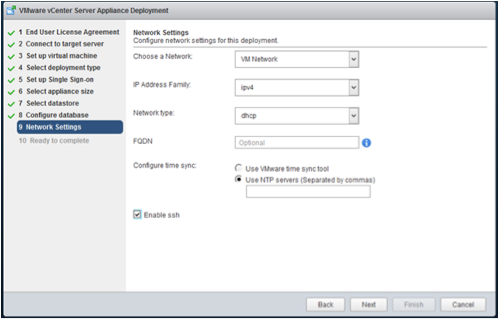
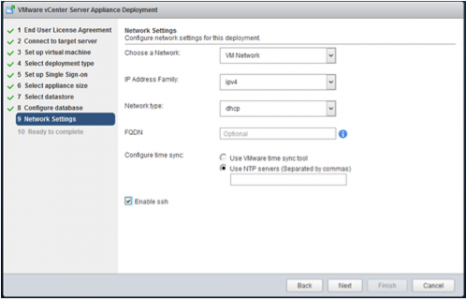
IP Settings eintragen.
Bildschirmfoto 2015-02-26 um 13.08.08

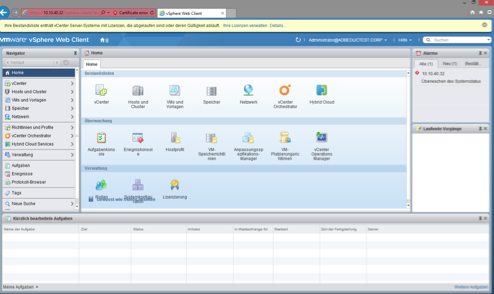
Und fertig ist die Installation der vCenter Appliance 6.0
Bildschirmfoto 2015-02-26 um 13.08.35

Zusätzlich wäre auch die Installation über das VIM-SETUP (vCenter Windows Installations ISO möglich)
Bildschirmfoto 2015-02-26 um 12.55.41

02/26/15

vSphere 6 – Features

Es mal wieder viel zu lange gedauert, allerdings hier die angekündigten Neuerungen von vSphere 6:
– VVOLS
– Content Library
– vSMP FT
– Long Distance vMotion (100ms Latencies)
– vMotion across Switches (dvSwitch / Standard vSwitch)
– vMotion von MSCS VMs mit pRDM
– VMFork (Instant Cloning)
– Network I/O Control (per VM)
– vSAN Neuerungen (Max. Werte und Features)
– vSphere Replication: Traffic Isolation und Komprimierung
– OpenStack

Ich werde versuchen in naher Zukunft auf die Neuerung individuell einzugehen, um euch unteranderem auch den UseCase näher zu bringen.

11/19/14

TPS – Security Risk

In Future Releases and Patches TPS is disable for Security Reasons. It is possible to use Transparent Page Sharing to gain unauthorized access to data, but this was tested under highly controlled conditions.

If you have a high overcommitted rate and would like to use TPS on the future Versions, you can enable TPS manually. You must configure “salt”. The vmkernel can control the participant for tps. In earlier Release it was enough that the Memory Page Content was the same, but now the vms must have the same “salt” value.
To set “salt” go to the Advanced option and set Mem.ShareForceSalting to 1.( 0 = disabled, 1 = enabled).

Each VM that should share the RAM with another one, should have the same salt value. This Value can you configure in the VMX File of each VM:
sched.mem.pshare.salt. If the options is not set in the vmx file vmkernel uses the vc.uuid value, but this value is unique for each vm and so we have no tps. 😉

If you have an older release or Patch, but you would like to disable TPS:

1. Go to the Advanced Setting of the ESXi Host
2. Click Mem
3. Search for Mem.ShareScanGHz and set this value to 0 (disable)
To take affect the host need a restart.

If you later use an new Patch, think about the Setting, because you must than set the value to the default value: Mem.ShareScanGHz to 4.

KB Number kb2080735

Thanks for READING!